
Hello there, everyone!
I’m going to bet you came here from my last post on the basics of network connections. Well, you’ve just walked into the next level of this little course. Pull up a seat, and let’s dive even deeper into the world of networking.
In the last post, you learned more about the basic hardware components of a network (Routers, Modems, Switches, Cables, etc). Now we’re going to dive into configuring a network. This is an amazing post for those who want to gain some comfort in setting up their own network from scratch, all the way down to configuring IP addresses, DHCP and other options!
Cabling: The big boy stuff: In the last blog post, you learned about the various types of cables, and the associated RJ-45 jacks. Here, we’re going to discuss how to terminate your own cables!
To start, you’ll need the following tools and parts. The majority of this you can get locally:
- RJ45 crimper
- 110 Punch down tool
- Ethernet Cable tester (Basic one will do in a pinch, but I recommend FLUKE or better)
- Fish tape or fish rod
- Ladder
- Hole Saw (For in-wall installs)
- RJ45 connectors (Match to the cable type you’re using)
- RJ45 jacks (Match to the cable type you’re using)
- CAT5e, 6 or 7 cable (Buy the bulk boxes)
- Mud rings/LV boxes (For in-wall installs)
- Wall plates or surface boxes (For the jacks)
- Patch Panel (For network closet – These come in both rack and wall mount versions)
- Equipment shelf, rack or cabinet (This is optional if you’re using rackmounted switches, routers, etc)
Ethernet has two different color code standards: T-568A and T-568B. 568A is the original standard, which allowed older phone wiring to be used, while 568B is the standard used today. See the picture below to learn the difference between the two:
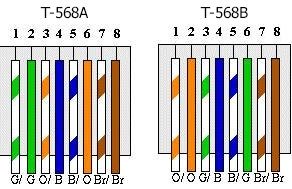
All cabling builds you’ll be doing will use the 568B standard.
What happens if I wire one end to 568A, and the other to 568B? Well, you’ll get what is called a crossover cable. While this used to be used to directly connect two PCs together without the need for a hub, switch or router, Thanks to Auto-MDIX (Automatic Media Dependent Interface), modern Ethernet adapters can detect what is on the other end, and configure it’s own port properly, eliminating the need for a crossover cable. They will still work in modern settings either way, so don’t discount it just yet!
Building your network: Cabling: If your office already has cabling and jacks, you will not need to anything except maybe install a new patch panel, so skip down to the patch panel part. Got a patch panel and all the jacks? Skip this section altogether! No jacks or wiring? No problem! Here’s the steps to building the base of your network. Don’t feel comfortable with this part, No problem. We can help you out!
Planning: Draw up a rough plan of where you will want Ethernet ports in your building. If they require special configuration (eg, Phones), Notate this on your plan sheets.
Running your cables: Once you have your plan drawn out, start fishing your cables from the central network closet to the decided-upon locations. If you are going in wall, Cut open the wall, and push your fish tape up if you’re able to. Be prepared to open some parts of the wall to work around cross studs. Once you have the cable run, label both ends. As Mickey Mouse says: this is a surprise tool that will help us later!
Installing jacks:When terminating ethernet jacks, you will want what is called a 110 punch-down tool. You can get these online, or at box stores like Home Depot. (Do not get this mixed up with a 66 punch down, which is used for punching down telephone cables on a 66 block).
Ethernet jacks will have the color codes for both 568A and 568B marked on their respective pins. Be sure you firmly punch down each end. Snap the jack into either a wall plate, or into a surface mounted box. Whichever you are using where the jack is being installed. Consider a different colored jack (orange, etc) for ports that will be application specific (Phone, etc) to help denote this from your normal PC jacks.
Installing your patch panel: Other than attaching to a box or wall plate, installation here is going to use the exact same procedure as terminating a normal ethernet jack. Use your tester to confirm that all 8 wires are properly connected.
Label your jacks: Remember when I had you label those cables you pulled? You did? Awesome! Well that tool is going to serve it’s purpose! You can either label the patch panel with the locations of each jack, OR label each jack with the corresponding jack number on the patch panel. Have application specific jacks?
Label these with an extra letter or number (Example, if the jack is for a phone, and it’s in position 3, label it 3V or V3). Try to terminate the cables for that location on the same jack number on each patch panel to simplify your setup. If you have multiple patch panels, give them a lettered prefix (eg, A, B, C, etc), and label your jacks accordingly (A1, A2, etc). You can also label them per their application (Phone, cameras, etc)
And voila! You now have the base of your network! Sit down, take a breather, have some lunch (I know a place with awesome chicken wings around here!). You just completed the heaviest part of your build. (And the messiest, so definitely clean up everything)
Building your network: Configuration: If you’re using off the shelf components (Router, Switch, etc), and don’t have much need for anything too drastic, you can skip past this. If you want to learn the nuts and bolts of network connectivity, stick around. We’re going to go into some detail. Here you will learn how to configure some pretty deep network settings.
MAC Addresses: MAC, or Medium Access Control (No, not a MAC computer), is a hardware address that is unique to the Ethernet or Wi-Fi adapter in your device. This address is extremely important to networking as it is used by your network equipment in various ways, as follows:
-Switch: Your switch uses the MAC address to map out what switch port a device is attached to. This helps the switch direct data intended for a specific workstation to be sent only to that workstation. This data is sent out to all switches through network broadcasting. This way, if there are multiple switches, each one knows which way to send data from device A to device B. Enterprise grade switches use MAC addresses as a form of port security, restricting that particular switch port to that single device.
- Router: Your router uses the MAC address to assign an IP address to the workstation. It then keeps track of this assignment in what is called a DHCP lease table. This is done so if the device is turned off, or off the network, then reintroduced or turned back on, it will receive the last IP address it had. This can also be used for some forms of internet filtering, as well as reserving a specific IP address for a device.
IP Addresses: This is what your devices need to communicate with each other, as well as to the wider internet. Note that unlike internet IP addresses, these are not publically routed, therefore cannot be accessed from outside. The trick to setting up IP address ranges, is to figure out how many devices in total you expect to have, then choose the correct range and DHCP pool assignments. You can choose to use addresses in one of the following three ranges:
192.168.x.x – This is the smallest range, with a maximum of 253 devices per subnet (.1 to .254, however, .1 is normally the router itself). You can use anythign from 192.168.0.1 to 192.168.254.254. .255 cannot be used at any time in this range as it is used for the broadcast address. The subnet mask for this will be 255.255.255.0
172.16.x.x – This is the middle road of the range, with a maximum of 1,048,576 devices. This range runs from 172.16.0.0 to 172.31.255.255 (This is pretty massive IF you use it all). If you use the whole thing, the subnet mask would be 255.240.0.0. (again, 0.0 and 31.255 cannot be used)
10.x.x.x – This is the biggest range, with a maximum of 16,777,216 devices! This range runs from 10.0.0.0 to 10.255.255.255, with the subnet mask of 255.0.0.0. (Again, only IF you use the entire subnet!)
If I choose a range, do I need to use ALL of it? Absolutely NOT! Those ranges are specifically reserved for private (local) networks! You can use as big of, or as small of a chunk as you need! In fact, some ISP routers (Comcast) use parts of the 10.x.x.x range as a 253 host /24 space (10.0.0.0/24, 10.1.10.0/24). Use what you feel you need.
What are these / numbers you keep throwing around? This is just a different way of notating a subnet mask. This is known as a CIDR, or Classless Inter-Domain Routing is an IP address allocaion method. For IPv4 (what we’re dealing with here), you can go from /32, which is just two hosts, down to /0 which is the entire internet, from 0.0.0.0 to 255.255.255.255. Of course, with what we’re doing, you’ll be best to stay between /24 and /8. Use a subnet calculator (check Google) to deterime which network size is right for you. In the case of many small businesses, a /24 (253 devices) is more than sufficient.
DHCP: Short for Dynamic Host Configuration Protocol, is the system used to automatically assign IP addresses to your devices. When a device is connected to your network, it sends out a broadcast message looking for the DHCP server. The DHCP server gets this message, and assigns your device everything it needs to work on your network: IP address, Subnet mask, Gateway, and DNS servers. This is known as a DHCP lease, which is the router’s record of what device has what IP address.
This lease is renewed periodically during the duration of the device’s connection to the network. If the device has been off the network for awhile, it’s DHCP lease is expired, and the IP address can be reassigned to another device. Many commercial and enterprise routers allow you to use DHCP “Reservations” to permanently assign an IP address to a device via it’s MAC address. It’s a good idea to only have ONE DHCP server on your network.
Gateway: This is what the device will use to access networks outside of it’s own (ie, the internet). This is generally going to be the IP address of the router itself.
DNS: DNS is responsible for translating web addresses (google.com) to IP addresses that devices can connect to. Think of this as the phone book to the internet. DNS can either be your router (which just forwards all queries to the DNS server it has configured for itself), an internal custom DNS server (such as a content filtering system, etc), or any one of the following trustworthy public DNS servers:
- 8.8.8.8 / 8.8.4.4 – Google DNS
- 1.1.1.1 / 1.0.0.1 – Cloudflare DNS
- 9.9.9.9 / 149.112.112.112 – Quad9 DNS
- 208.67.220.220 / 208.67.222.222 – Cisco OpenDNS (Can be used for filtering)
- 94.140.14.14 / 94.140.15.15 – AdGuard DNS (Ad Blocking)
WATCH OUT: Be careful in choosing your DNS servers. Use the above listed public servers to be safe, or use the ones provided by your internet service. As DNS servers can be manipulated to return customized results (This is how DNS based filtering works), Using an unknown resolver can place you at risk of a data breach. Again, if you wish to use outside DNS, use the ones I listed above!)
WATCH OUT: When configuring DNS, you get options to specify primary and secondary. This does NOT mean the device will use the primary as it’s main, and secondary as a fallback, but rather will use them at random. If you are using content filtering of some sort, do not specify outside DNS in any way for your devices.
With that, there’s the second level of networking! You’ve cabled up everything, set up your equipment (routers, switches, etc), and set up your chosen IP ranges, DNS options and all. Go ahead, sit down, and rest a bit.
Somewhere down the road, we’ll go even deeper into networking (Hey, hold, it, wait! This rabbit hole goes even further?!) and discuss more geek level stuff, such as setting up VPNs, different types of network filtering, much about